Sounds like a plan.

Depart: Pegasus Ice Runway, Antarctica ~ February 25, 2006
Arrive: Boulder, Colorado - May 27, 2006

Saturday, May 27, 2006

Once again I find myself sitting in an airport terminal waiting around for a flight, this time I'm in Lexington, headed to Charlotte, but if I didn't know better I could be pretty much anywhere in the developed world. A fuzzy memory and a little addition says this will be the 15th flight I've caught in the last year or so, no wonder I feel at home here in the corner pecking away at a laptop keyboard with the cellphone set to vibrate and the headphones playing bootlegged Pearl Jam. Don't really want to do it, but the voices in my head coerced me into volunteering to get bumped off this flight if it's overbooked. I'd give an awful lot right now for some time off and a comfortable bed, but a stack of travel vouchers might be nice to have later this summer.

Looking forward to getting started with this WFR class that I'll be starting in about two weeks. It's something I've wanted to do for several years now, but haven't had the time, money, and class availability until now. Don't really know why I, as an engineering major, really need to spend a significant amount of money on a first aid class and certification, but that little voice might be able to tell you more. Whatever the motivation, a WFR cert will definitely make my resume look a little better, and a bit of good first aid training couldn't hurt either. Not quite as excited about the idea of looking for a new job or a place to stay in Boulder, but I suppose it's the next logical step. It'll be nice to have a place to call my own again though, just hoping that the searching process goes quickly and smoothly. Hopefully, by getting back into Boulder sometime soon after the spring semester has let off, I'll be in a good position to get a good housing situation at a relatively low price.

Cutting corners?


Blog continued over at ianr44.blogspot.com

Wednesday, May 24, 2006

Back in Berea

Been doing a whole bunch of driving lately, but think that's done for now. After the last post here, I drove with Graham (little brother) and Ben (friend of Graham and I) up to Kentucky by way of Neels gap. Fortunately, my box of stuff made it in before we did, so after quickly checking the fit on the clothes and double checking that the other stuff worked, we packed up and headed north! I drove the whole way up, which turned out to be pretty nice because we had good weather and generally not too much traffic. Graham did the navigating, although we both pretty much have the route memorized at this point :)

Made it up to Berea Wednesday evening, unpacked the car and repacked my stuff, visited with mom for a bit and our friend Larrey stopped by for a bit too! Got out early the next morning and zoomed back down I75, around Knoxville, and over to the tri-cities airport to pick up Phoenix Rising, a hiker friend who needed a ride up to traildays. We met up quickly at the airport, then headed off to Damascus!

Traildays was muddy, wet, and lots of fun as usual. Not quite as many 2003 thruhikers were there as we had last year, but we did have quite a strong showing and managed to get somewhat organized and eat dinner at Sicily's Saturday night. It was really fun to see a bunch of hiker friends, catch up on what people have been doing, eat a bunch of good food, see some funny stuff, hang out chatting until the wee hours of the morning, and all that sort of thing. Had a good test of my spiffy new tent too, was crashed out for a bit in it during what was apparently a raging little storm and didn't even notice anything but the rain until walking around outside afterwards and seeing other tents blown over and such. Also got to chat for a few minutes with Moonshadow about our possible river trip for summer of 2007, sounds like we might actually pull it off, so that's cool.

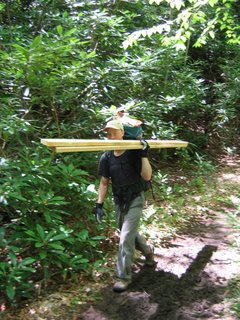
Hardcore, as usual, was a bunch of fun too! We had something like 130 people volunteer this year, so (also as usual) things got done a bit quicker than expected on the first day. We packed in a whole bunch of lumber and some carpentry tools through about a mile and a half of trail in the first couple hours, which was expected to take all day. I ended up only making a trip and a half - first one I loaded a pack with a bunch of wood and a bag of chips on top (hiker fuel!) and carried a couple boards, then by the second round, there was nothing left to pack in so just swapped in and helped with some roofing tin. Unfortunately, we didn't have the truckload of trail tools at the worksite (the packing phase was supposed to take all day,) so a bunch of people sat idle all afternoon, but it was fun nevertheless. I spent the rest of the evening working with Camo, Flying Porkchop, and trail Yeti doing stone work to build a waterfall (don't have any pics handy, but it's pretty cool) and a little bench for getting water above the new fall. Ended up losing a sleeping pad that I never even had a chance to use for sleeping - had it with me to use as a seat at the jobsite, but left it sitting at the trailhead because I needed the pack space for lumber. The pad was gone when I returned, I figured it was because someone thought it had been lost and intended to return it, but after asking around for the next day it never turned up...

The next day we split into two groups with the larger one heading over to Unaca Mountain to cut some new trail. I stayed with the shelter crew where we worked on cutting a new trail between the shelter and our water bench. The water trail was over some pretty gnarly terrain and required quite a bit of cribbing and moving some rather large rocks around (by hand, I once again swore I'd bring a big come-along, snatch cables, chains, and webbing next time...) Had a good time and beautiful weather, but didn't quite manage to get everything finished before quitting time. Did get a huge amount of work done though, and took care of all the hard stuff so the Tennessee Eastman club that normally maintains this section should be able to finish everything up. Dinner was excellent Pasta, sauce, salad, and ice cream - we went through 30lbs of dry noodles in one sitting! Good times!

Tuesday was a day of driving, I took four hikers who volunteered with Harcore back up to where they had left the trail at VA42, which is somewhere in the viscinity of Pearisburg, then headed from there up to I64, then over to Lexington, and finally down to Berea. Something like 11 hours of driving by the time it was all done. Part of the deal with Hardcore is that if you volunteer as a hiker, you're given a ride back to wherever you were on the AT before you came in to help out. It's a really neat system, and pretty amazing that it works, but it seems to work out fine every year so far!


Unfortunately, I didn't take a single picture over the last week or so, but did manage to get a copy of some other people's pics from the first day of hardcore, so here are a couple of those!

Bob Peoples, the guy behind Hardcore, posing with the signup boards:
Bob Peoples with his hardcore signup boards

Me packing in shelter parts on the first day of hardcore:
Ian packing stuff in with Hardcore

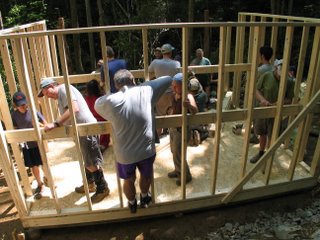
The new shelter under construction:
Our new shelter under construction

Wednesday, May 17, 2006

Hitting the road

So the car's packed up and ready to roll, just kicking around a little longer at my dad's place so we can smoothly rendezvous with our UPS driver at Neels gap (which is fortunately on the way to Kentucky) where I can hopefully pick up my last box of stuff gained through working at the shop.

Talking to my dad last night, I found out that my grandfather made it to another milestone in life this week. Got me thinking about the strange symmetries in life - starting with the often alluded to cycle of birth and death, but continuing on to all sorts of weird things that I probably never would have thought about without a close family member slowly succombing to Altzheimers. Remembering stuff happened over the past several years like having to take his drivers license taken away because he couldn't safely drive anymore years after being given a drivers license once they became part of our culture. Remembering moving grandad to a nursing home vs him moving into the first home of many that he would build. Lately the symmetries have been getting a bit more basic, more obvious, and more painful to watch. Sometime, I suppose in 1917 or 1918, he was taught how to use a spoon...

Feels good to be on the road again.

Tuesday, May 16, 2006

The plan, as it stands now.

So, done with working at Neels Gap for a while. Managed to work things such that I ended up owing work just $5.46 after it was all said and done! Should be turning some of the gear I've acquired into cash when I get to traildays, so it all works out :). Also got plans for the next several weeks pretty much ironed out, so that's cool. My brother and I will be driving up to Kentucky tomorrow, from whence I'll take the car over to Traildays the following morning! Planning on working with the Leki guys a bit fixing people's tired and worn out hiking gear, but mostly just hanging out with a bunch of hiker friends who'll be there. Heading out to "Hardcore" Sunday morning - it's a rather unique trail maintenance gig that happens every year. Basically, my friend Bob Peoples (of TEHC and Kincora Hostel fame) organizes a giant maintenance project and recruits a bunch of current thruhikers and freaks like me to go out and get it done over the course of two very busy days. It's a lot of fun. That's the kind of fun where you end up hauling a wooden bridge several miles (mostly uphill) over trail that's simultaneously being cut by hand (by the other volunteers,) starting early in the morning, and while working off a massive hangover from the previous several days of partying is your kind of thing to do for fun. It's fun stuff! This will be my fourth year running, so I might end up with some minions this time - all that much more fun!

Probably won't be posting too much more on this blog, once traildays is over I'll be on the road again - back to KY, then CO, then that WFR course, then looking for a new place in Boulder. It's nice to be moving again, think it's a chronic obsession now...

Wednesday, May 10, 2006

Album of the evening: JJ Cale - Troubadour

Been putting in a bunch more screen time today so far, but keep getting distracted by daydreaming about getting back into the mountains. Also looking forward to seeing a everybody at Traildays in about a week. Finished up a resume to fax off to a few places in Boulder. Hoping to get a decent job in the outdoor industry there, don't know whether I could handle a tech job and a bunch of engineering/tech classes at the same time. Caught a little glitch in my FAFSA and got that corrected, which reminds me of a little rant that's a bit overdue.

I moved out to Colorado in August of 2004 mostly so that I could work towards residency and instate tuition status at CU for the fall of 2005 semester. Why go to all the trouble of moving a year in advance? Because it's seventeen thousand four hundred fifty four dollars PER YEAR (source)cheaper to attend classes as a state resident versus an out of state student. In addition to living in Colorado for a year prior to becoming a student, I must live completely financially independent from my parents, which isn't really all that big of a deal since I was doing it anyhow. The kicker is that, although I'm financially independent, I have to report my parent's income and assets so they can be figured into this whole financial aid thing. So, essentially their resources (which I can't touch without incurring an additional $1.99/hour for the entire 3 or so years I'm in school) are tallied and that amount is taken out of my potential financial aid package for school. Talk about an annoying catch-22!

Tuesday, May 09, 2006

Yay

I know it's not that big of a deal, but got an AVR programmer and C development toolchain setup and working! Time for bed now.

Photo Etching PCBs

Another quick howto I've been meaning to write for quite a while. There are several detailed guides available on the net, so I'm not going to go into too much detail except on some parts that took me a while to get ironed out.

Definitions:
PCB - Printed Circuit Board - a laminate generally composed of layers of fiberglass and copper. The ones we start with here are pre-coated with a photosensitive compound that makes this whole process possible.

Developer - The chemical solution you use to dissolve the photosensitive coating from the PCB where it has been exposed to UV light

Exposing - Allowing light to strike the coated PCB where we want to remove copper later in the etching stage. Generally facilitated by a fluorescent bulb positioned in a "light box," although I suppose if you were resourceful and had a light meter, it would be possible to use sunlight for the purpose.

Etchant - A chemical solution that dissolves copper, but not the photosensitive coating that's left on after exposing and developing our PCBs.

Materials:
Photo etch materials

*Positive coated PCB - So far, I've tried Injectorall and MG Chemicals brands, seem to have better luck with the MG stuff.

*Light box - We just tossed together a really basic little light box that has a single fluorescent UV bulb in it, probably would get better results for large PCBs by using one with multiple bulbs, but since I tend to play with smallish stuff it's not a big deal. It's probably fine to use a grow-light or other full spectrum bulb, but we just went ahead and started out with a bulb made for the purpose.

*Mask - From what I've heard, the best thing to print your mask onto is thick tracing paper, but since we already had some of those acetate transparency sheets, I've just been using them. Laser printers are definitely the way to go, the toner they use for printing is much more opaque than ink and they generally have much better resolution than inkjet printers. When you print your mask out, you want to end up with black where the copper should be and clear where you don't want to end up with any copper. Very carefully (especially when doing boards for SMT stuff with teeny traces) check your mask for any bubbles, scratches, or whatever and fix them with a black sharpie marker before you get started with exposing and etching the board. To get the easiest to work with solder pads for thru-hole connections, draw a little square for the pad (easier to solder than a circle for whatever reason - seems to flow nicer) then put a clear dot in the center so that when you etch the board, it will leave a little divet for centering the drill. When you expose the board, you want the toner side against the PCB, so mirror the layout for SMT stuff and don't for thru-hole if you draw your layout from the perspective of looking down at the top of the finished board. Of course, use your brain and mirror when appropriate if you're mixing SMT and thru-hole (as I generally do lately,) or making double sided boards. If you use the transparency film, sometimes it has a matte coating applied to one side for inkjet printers - this coating is a pain in the butt to deal with in a wet environment (like the bathroom you end up spinning boards in,) so wash it off with some steel wool in a sink before you get started.

*Developer - Don't even bother with the straight sodium hydroxide solution recipes you'll find a lot of on the net - it's very very temperature and concentration sensitive, and it's very easy to over-develop the board where the traces will all lift off leaving you with a bare PCB. Instead, use a recipe similar to the following that uses both sodium hydroxide and sodium silicate to make a much friendlier developer. Or, of course you could track down a commercial version of the same thing if you're feeling a little less like a recreational chemist:

Making silicate based developer:
Ingredients:
*Water, 480mL - Tap water if you don't have too many minerals or a lot of chlorine in yours, probably not a bad idea to use distilled (as in grocery store distilled, nothing fancy) water if yours isn't too pure by itself. Had no problems so far using well water.

*Sodium Hydroxide, 14.5g - Aka lye aka caustic soda. Easy to get in the form of Red Devil drain opener (double check before you use it, but what I've seen is anhydrous (or at least as anhydrous as lye gets in reality) lye granules. Tricky to measure out accurately as it sucks water out of the air really quickly, so work fast and don't get it on your fingers!

*Sodium Silicate solution, 40% ~10mL - Aka "Water Glass." Harder to find than sodium hydroxide, but still not too hard to track down. Gets used for glazing ceramics and according to the wikipedia article I just linked to, a bunch of other things as well. We just happened to have some lying around, so I can't name a particular source for it. The trick here is that I'm not completely sure what the concentration of the solution I've been using is. It was originally 20%, but the stuff will gradually precipitate out of solution and this was definitely an old jar of solution. If you have problems with your board overdeveloping (traces showing clearly, then lifting off,) maybe try adding a bit more silicate solution.

So, to mix the stuff up, start with say 30mL water, slowly stir in your sodium hydroxide (this part is definitely an exothermic reaction, so take it slow to keep from boiling the water and causing problems,) add the sodium silicate, then the rest of the water. Voila!


*Water - Used as a stop-bath when you develop the boards, and for wiping up any developer or etchant that gets dribbled on the bathroom counter before it stains/dissolves things.

*Etchant - Your usual ferric chloride etchant that's still available from most any halfway decent electronics supplier. Fresher stuff works better, or you can actually electroplate out the copper from old etchant to re-use it, but I'll leave that as an exercise for the reader :).

*Tubs for developer, water, and etchant - I use some little rubbermaid bins for this purpose, some people use fancier arrangements for the etchant that heat the etchant and blow bubbles to make things go faster. Swishing the whole deal around by hand works fine for me.

*Thin bit of plate glass - Make sure it's not the kind with a UV blocking coating :)

*Split hose thingies - Used for double sided boards, described later

*Tweezers

*Timepiece

The process...
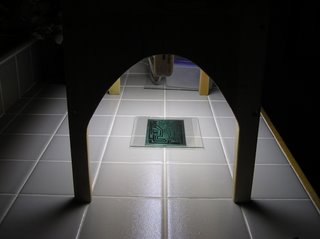
Exposing the board

Draw up and print your mask. Double check that it's in good shape, that the scale is right, and that it's pretty. In some sort of place without direct sunlight and a nearby water source (the bathroom,) peel off the protective cover from your PCB, place it facing up on the surface, put your mask toner side down on the board, place the glass over this to press the mask down against the PCB. Put your light source over the whole arrangement, turn on the light for a bit (4.5 minutes with my setup, you'll have to play with yours to see what works.) Turn off the light, gently remove the glass and mask. Drop the PCB into the developer solution and gently agitate while closely watching the board. The areas that were exposed to light should fairly quickly dissolve and dissipate, leaving only the areas that were kept in shadow by your mask. As soon as it looks done, pluck the board out with tweezers (being careful not to scratch the resist that's left behind) and put the board in the water bath, and agitate to rinse off any excess developer. Ideally, at this point, you just need to drop the board into some etchant and etch as usual. Realistically, you'll have to tweak exposure times and such before you get your system dialed in, but it's not that big of a deal.

You want to get the exposure time (the single biggest variable when you're using a good silicate developer solution) where it's adequate to completely remove all the resist where light hits it, but not much longer to prevent the shadowed areas from being exposed to too much UV. Injectorall (I think) makes a nice little mask that's basically a pair of triangles with their tips touching (ASCII art version- |><| ) that you can use to gauge exposure time. If the area with the tips touching has too much copper left when it's all done, your esposure time is too short, if the tips aren't touching at all when it's done, the time was too long, if it's perfect than so is your exposure time!

I haven't done much with double sided boards since what I generally do is single-run stuff and I don't mind using jumpers, but from my limited experience it's not too hard to print alignment marks on the top and bottom masks that line up with the real life corners of the PCB, then expose the two sides individually before dropping the board into developer and then etchant. When developing or etching double sided boards, make 4 split hose thingies and use them to make sure that developer and etchant can circulate around both sides of the board. Split hose thingies are short (say 1/2 inch) bits of small (3/16 inch ID) vinyl (or similar) hose with a cut running down the axis such that they can be stuck on the edges of your board to make the board itself stand off the bottom of the developer/etchant tub. It's important to remember not to run traces too close to the edge of the board if you're going to use this technique - I generally try to leave about a quarter inch margin around layouts for this reason and because cutting the coated boards (they're all cut at some point) generally leaves a bit of funky coating on the edges that wouldn't be good to use for electrical paths.

Sources/Resources:
Digikey - Coated PCBs, parts to put on the finished boards.
Radio Shack - As much as I hate recommending this company, they're who I generally get etchant from.
Your local grocery store - lye for making developer solution.
http://www.electricstuff.co.uk/pcbs.html - A better, more thorough howto. Also where the inspiration for the above developer recipe came from.

Anyhow, that's all I've got to say about photo-etching PCBs for now!
Gateway Solo 3450 hard drive swap

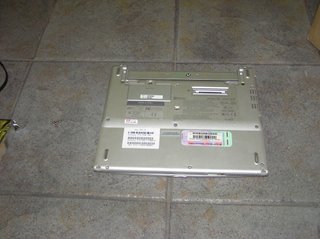
Not that it's any different from most compact laptops out there (excepting ibooks, which are a bit of a pain, but easy to find other info on the net) but here's a super quick series of pictures illustrating taking apart a solo 3450 enough to swap out the hard drive in it:

First, pull out the screws on the bottom. Think there were 9 of them, pull the ones that are under the touchpad panel and keyboard, leaving only the ones under the screen hinges in.
bottom of laptop


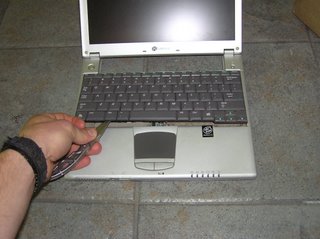
Take out the keyboard:
Removing keyboard


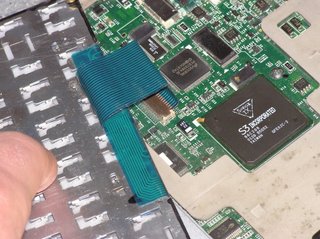
To unhook the keyboard, there's just the one usual flat cable to deal with. To release it, slide the little white tabs on the connector in the direction that the cable exits the connector. You can see the little tabs in this picture:
Closeup of keyboard connector


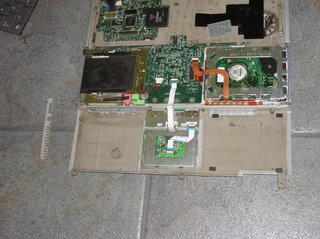
Don't bother unhooking the front case with the touchpad, just flip it out of the way to reveal the hard drive and it's carrier:
Laptop guts!


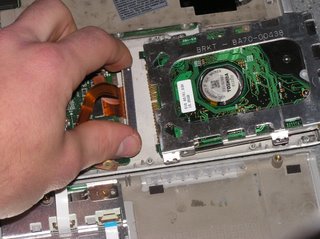
Pull out the four screws that hold the hard drive carriage in place, unhook the hard drive cable from the drive, change the drive, repeat directions in reverse.
Removing the hard drive


A few random tips on working with laptops:
* A lot of people overtighten screws, make sure you're not one of those people before messing with laptops. They generally use cheap screws that strip out easily, and a lot of the time the screws aren't threaded into the sturdiest arrangements (often a brass boss molded into a plastic case) so those can be broken too.

* Use the right tools for the job - generally a #0 philips and some assorted small slotted drivers, a small allen set, small torx drivers, tweezers, needle nose pliers, a clean single edge razor blade, and of course a pocket knife are the tools that'll get you the most mileage. I find myself using a headlight a bunch too, but a regular desk lamp can do as well.

* I often set a piece of paper on the bench next to a laptop, write descriptions of where screws came from, draw a circle, and place the appropriate screws there to keep things straight. Often there will be several different styles of screws involved, so you need to keep track somehow.

* Use a good work surface - best thing is a workbench that's got plenty room to spread out parts, is higher than say a dinner table for good posture, and has good lighting. Next best bet is a good hard floor. Working on the floor is kindof nice sometimes, because if you happen to drop a screw it's not going to bounce off to places unknown if it's only falling from a couple inches.

* Keep some good electrical tape handy, things in laptops are often taped together, so you'll need to replace the tape you remove when putting things back together. New tape works better than sticking the same old tape where it came from.

* Keep wax paper handy for holding on to the little sticky screw covers and "warranty void if removed" stickers while you're tearing into things, then you can put them all back in the correct place later.

So, suppose that's all for the laptop stuff for now, maybe some NZ pictures coming later this evening?

EXT2/3 for windows

Just ran across a really nifty little driver that I didn't know about, so here's a post about it! I've been running dual-boot systems for a while, tend to use Linux for pretty much everything, but it seems like there's always an application or two that I need a copy of windows for. So, I was just working on the windows partition and happened to think "gee, wouldn't it be nice if someone wrote a driver that would make extension 3 filesystems usable to windows?," did a quick google search and wouldn't you know someone's done it already! And, it seems to work perfectly!

So, here's the link.

Busy busy busy

Back into that kind of busy where you look back a week or two and nothing has changed. Of course not everything is the same, just feeling like my life is settling back into something like normalacy. Been moving more through time and less through space for a change. Still spending a fair amount of time working up at the outfitter and either hiking or working on electronics stuff the rest of the time. Have laid out some plans for the next month or so, made arrangements for a rides to get where I need to go, and finished up with my ordering toys from various gear companies. At this point, I've basically acquired enough new stuff that I've now got a full winter mountaineering setup to cover pretty much anything up to technical ice climbing. Yay! Hopefully will be able to get out into the mountains a bunch this coming year or so to use some of it. The list of new, big, items at this point looks like:

Western Mountaineering Puma SDL sleeping bag
La Sportiva Makalu boots
Black Diamond Sabretooth clip in crampons (more later)
Exped Sirius tent
Exped Down Mat 7 pad
Outdoor Research hats, gloves, etc.
Small stuff that'll get use year round like a snazzy compass, silk liner bag, fresh closed cell foam pad, casual clothes, etc.

So, regarding those Black Diamond Sabretooth clip-in crampons... Short version - I'm not too impressed, get the Grivel G12 instead. I've used the "New Classic" version of the G12s and liked them, and the "New Matic" version that's comparable to the Sabretooth clip has a better (IMHO) clip arrangement than the Sabretooth (see below.) Nevertheless, I can't get Grivel, but can get Black Diamond stuff through pro deals or wholesale at the moment, so that's what I've got.

Longer version would be that the Black Diamond crampons don't seem all that solid to me. The main thing that I don't like is that the little clip arrangement in the back is attached such that if it breaks at all, the crampon isn't held onto your foot. As illustrated in the picture, the strap is sewn onto the plastic clip at two different points individually, but it's not attached to itself. What this means is that if either of those little ears breaks off, and that doesn't seem all that unlikely to me given that it's plastic and it's on the very back of your heel, the strap will effectively not loop around your foot and the clip will be free to unbuckle. In that situation, the main attaching mechanism is obviously open, and the safety strap that would otherwise hold the crampon to your boot isn't there to help either. Whoopsie! So, as also illustrated in the picture, I tied a little loop of kevlar thread in as a backup in case it ever does break. Nice to have that stuff lying around, it's nearly as neat as ducktape :) My little fix is something that I'd not want to rely on, but it doesn't interfere with normal operation and hopefully I'm worrying about nothing in the first place so it won't matter. Other main complaint about the sabretooths (and much of Black Diamond's gear for that matter) is that their designers seem obsessed with sticking their logo everywhere possible. I find that annoying. Their diamond logo is present (as in stamped/molded in) 8 times on each of the crampons themselves, not counting the strap where it's dyed into the webbing (everyone seems to do that, so I'm not counting it,) and the words "Black Diamond" are both silkscreened onto each crampon once, and are on a silly little rubber tag that's sewn into the straps. So, again not counting the webbing, that's 20 instances of a Black Diamond logo/insignia per pair, not counting the optional ABS plates which I have on backorder. The logos can't do anything to help the performance of their products, and definitely add cost, so what's the point? Why is 20 times better than say 4? It's obviously just about the looks, but I personally think it just looks stupid.

The bug(fix):


So, I suppose that's enough for one post. I'll probably be posting a bunch more crap on here later since I'm finally getting around to organizing pictures from the last 8 months...